Why your basement floor is leaking
A leaking basement floor in Auckland is nearly always a symptom of a bigger moisture problem—not just a minor nuisance—so the key is understanding the cause and then choosing the right long‑term fix, not just a quick patch.
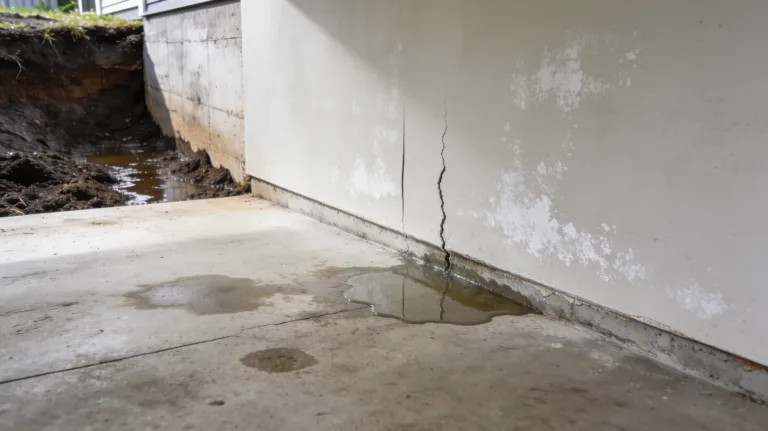
Why your basement floor is leaking
Even if the water seems to “appear” from nowhere, there is always a path and a pressure driving it. Common causes include:
-
Hydrostatic pressure from groundwater – After heavy rain, saturated soil around your foundations pushes water up and through any weak point in the slab, joints, or penetrations.
-
Poor external drainage – Blocked or undersized gutters, short downpipes, or flat landscaping allow water to pond right beside the basement wall or beneath the slab.
-
Cracks in the slab or construction joints – Hairline cracks, shrinkage cracks around columns, or joints between old and new concrete become capillaries for water under pressure.
-
Inadequate or missing damp‑proof membrane (DPM) – Older basements or garages often lack a continuous DPM under the slab, so moisture wicks directly through the concrete.
-
Failed waterproofing system – Ageing coatings, incorrect products, or damaged membranes on the positive (outside) or negative (inside) side stop doing their job and let water track underneath.
In Auckland, high rainfall, clay‑rich soils that hold water, and older drainage designs make all of these more common, especially in homes built before modern E2/AS1 waterproofing details became standard.
Warning signs to look for on the floor
A leaking basement floor is not always a visible puddle in the middle of the room. Other red flags include:
-
Dark, damp patches after rain or when the water table is high.
-
Efflorescence – white, powdery salts on the concrete surface, especially along hairline cracks or control joints.
-
Peeling paint, blistering floor coatings, or lifting vinyl where moisture is trapped.
-
Musty odours and visible mould growth on skirting boards, stored items, or adjacent gib linings.
-
Rusting fixings, swollen timber framing, or soft spots at the base of walls that sit on the slab.
These signs tell you the leak has been happening for a while, even if you only notice standing water occasionally.
Why you should not ignore a leaking basement floor
Leaving a leaking slab “for later” usually shifts the cost from a simple waterproofing repair to structural and health issues. Key risks are:
-
Structural damage – Ongoing moisture and hydrostatic pressure can weaken concrete, corrode reinforcing steel, and damage masonry walls tied into the slab.
-
Mould and indoor air quality issues – Damp basements create an ideal environment for mould spores that can spread through the rest of the home.
-
Damage to finishes and belongings – Flooring, framing, insulation, and stored items quickly deteriorate when repeatedly wet.
-
Insurance and resale problems – Visible leaks or a history of moisture issues can affect insurance, delay CCC sign‑off on renovations, and reduce buyer confidence at sale time.
Addressing the problem early not only protects the building, it also protects your ability to renovate or sell later without difficult questions from banks, insurers, or purchasers.
How we diagnose a leaking basement floor
Finding the source of the leak is the first—and most important—step before choosing any fix. A typical investigation includes:
-
Site and drainage inspection – Checking gutters, downpipes, surface falls, garden beds, paved areas, and retaining walls to see how water flows around the property.
-
Slab and wall assessment – Looking for cracks, cold joints, old patch repairs, penetrations (pipes, sump lines), and signs of past water tracking along the floor‑wall junction.
-
Moisture and leak tracking – Using moisture readings and timing inspections with or soon after rain events to see where water first appears.
-
Checking for missing or failed waterproofing – Reviewing plans where available and assessing whether membranes, DPMs, or drainage were ever installed to current best‑practice standards.
In some cases, the issue is purely external (for example, a blocked downpipe flooding against the wall), while in others the slab itself is acting like a sponge because of missing damp‑proofing.
Short‑term vs long‑term repair options
Not every leaking basement floor needs full excavation on day one, but it is important to understand which options are temporary and which are designed for long‑term performance.
Short‑term or stop‑gap measures
These are useful to limit damage while planning a proper solution:
-
Crack patching with hydraulic cement – Suitable for small, active leaks through visible cracks or joints; it expands as it cures and can resist some water pressure.
-
Local sealants and coatings – Brush‑on interior waterproof coatings can reduce minor seepage, especially when combined with good ventilation and dehumidification.
-
Dehumidifiers and fans – Help control surface condensation and humidity, protecting contents but not addressing the root cause.
These options buy time, but without addressing drainage, hydrostatic pressure, or missing membranes, water usually finds another path back in.
Long‑term and best‑practice solutions
For a lasting result, the system must manage water before it reaches your basement floor and provide a reliable barrier. Depending on your situation, this can include:
-
External drainage upgrades – Improving site falls, extending downpipes, installing or renewing subsoil drains, and using free‑draining backfill to relieve pressure at the wall.
-
Positive‑side waterproofing – Applying or renewing membranes to the outside of basement walls and footings during renovations or where excavation is possible.
-
Interior drainage channels and sump pumps – Creating a controlled path for water under or beside the slab to a sump, then pumping it safely away from the structure.
-
Negative‑side waterproofing systems – High‑performance internal membranes and coatings that resist water pressure from the outside, often combined with crack injection and joint treatment.
-
Structural crack repair – Epoxy or polyurethane injection for cracks that move with the building, restoring structural continuity and blocking water at the same time.
The right combination depends on the age of your home, access conditions around the basement, and whether the space is used for storage, garaging, or as a habitable room.
What the NZ Building Code expects
Under the New Zealand Building Code (particularly Clause E2 External Moisture), basements and floors in contact with the ground must be built so that moisture does not accumulate and cause dampness or damage. Key best‑practice elements include:
-
Adequate clearance from finished ground levels to floor surfaces and claddings.
-
A continuous damp‑proof membrane under slabs on ground to prevent moisture rising through the concrete.
-
Proper site grading so water flows away from the building, not toward it.
-
Robust drainage layers and subsoil drains around basement walls to relieve hydrostatic pressure.
-
Protection of all waterproofing membranes from punctures, UV, and construction damage.
If your basement is being converted into a bedroom, office, or flat, council and lenders will expect evidence that the space is dry, healthy, and Code‑compliant. Addressing a leaking floor now is often easier than retrofitting everything later when you decide to renovate.
How A Plus Waterproofing can help
A leaking basement floor in Auckland is rarely a simple DIY fix, especially where structural elements, drainage, or Building Code compliance are involved. As specialist waterproofers, we:
-
Carry out detailed inspections of the basement, slab, and surrounding site to identify the true cause of the leak—not just the visible symptom.
-
Recommend solutions that balance effectiveness, budget, and how you actually use the space (storage vs habitable vs investment property).
-
Use proven systems, including crack injection, negative‑side and positive‑side membranes, and drainage upgrades matched to New Zealand conditions.
-
Work in line with NZ Building Code expectations and best‑practice guidance so your repair supports future renovations, compliance, and resale.
Every basement is different, so the most cost‑effective approach is to start with a proper assessment, then build a tailored scope of works around your home and your priorities.
Next steps if your basement floor is leaking
If you are currently seeing damp patches or active leaks on your basement floor, here is a practical sequence to follow:
-
Document what you are seeing – Note where the water appears, how quickly it shows after rain, and take photos over a few events. This information helps pinpoint patterns.
-
Check the easy external issues – Clear gutters and downpipes, look for obvious ponding near walls, and ensure temporary extensions direct water well away from the house.
-
Protect contents and finishes – Move sensitive items off the floor, lift carpets or rugs in affected areas, and use dehumidifiers to limit mould growth while you organise repairs.
-
Arrange a professional inspection – An experienced waterproofing specialist can trace the moisture path, assess the structure, and outline both short‑term and long‑term repair options.
-
Plan a staged solution if needed – In some cases, you can start with targeted repairs and drainage improvements, then schedule larger works (like external excavation) at a time that suits your budget and renovation plans.
A dry, healthy basement floor is achievable in Auckland’s climate when drainage, pressure, and waterproofing are all addressed together—not in isolation.
What’s the main way you are using (or planning to use) your basement space—storage, garaging, or as a fully habitable room?